How To Make Your Own Prunes
Do you have a glut of plums? If so have you ever thought about drying them? This guide on how to make your own prunes shows you just how easy it is. You’ll also find a review of Innoteck’s Air Fryer oven which makes the process more efficient. It also negates the need for a separate dehydrator.
This post may contain affiliate links. As an Amazon Associate, I earn from qualifying purchases. See my cookie and privacy statement for further details.
This post is in two halves. The first is a review of the Innoteck air fryer and the second is the section on how to make your own prunes. You can use this link to jump directly to the second half.
Innoteck Kitchen Pro 6 in 1 Air Fryer Oven
The Innoteck Kitchen Pro 6 in 1 Air Fryer Oven is a great piece of kit. It acts as an air fryer, a mini oven, a dehydrator and it has a built in rotisserie.

You can air fry, roast, bake, reheat and dehydrate. It cooks faster than a conventional oven and requires a lot less fat for frying and roasting. This is down to hot air that circulates around the food evenly as it cooks.
Temperature control ranges from 65-200°C and 30-80°C for the dehydration.
The 12 litre model I have is the perfect size for two people. There is a larger 16 litre capacity model though for those who need something more substantial.
What Do You Get?
You get a surprising amount with this 12 litre capacity Innoteck air fryer. I’ve listed the highlights below, but there’s more to it than these.
- Digital touch control panel.
- Stop / start button.
- Air vents – to let out the steam. Just what you need to dehydrate your plums or anything else.
- Non-slip feet.
- Double layer glass door – for insulation.
- Temperature and time dial – easy to increase or decrease when food is cooking.
- 8 auto programmes – includes: french fries, baking, rotisserie and dehydrator.
- Stainless steel handle – stays cool so you can open the door with your hands whilst food is cooking.
- 1800 watt power output.
- Dishwasher safe accessories.
- 3 stainless steel mesh racks.
- Drip tray – avoids mess and is easily washable.
- Rotating stainless steel basket – perfect for potato and vegetable chips.
- Stainless steel rotisserie skewer – great for vegetable kebabs.
What Did I Make?
I roasted aubergine and sweetcorn for a dish I was making. I brushed them with a tiny amount of oil before I placed them on the racks and into the air fryer. They were both so good, I roasted them again a couple of days later.
I baked a delicious apple cake and some gorgeous vegetable tarts. I “fried” some chips made from our own homegrown potatoes in just a teaspoon of sunflower oil. And I also reheated some pies from the freezer.
But the thing I’m most excited about is the dried plums. You can find out how to make your own prunes further down the post.
What I Really Liked
Efficient
This mini oven, come air fryer, saves turning on an expensive conventional oven for many cooking needs. It heats up almost instantaneously, so there’s no-need to preheat. I even baked a cake without preheating first.
Multi-functional
I really like the multi-functionality of this piece of kit. It’s really versatile and does a lot. I’ve still much to explore, but so far I’ve roasted veg, fried chips, heated frozen pies, baked a cake, dried plums and baked tarts. And I’m very happy with how everything’s turned out.
Dehydrator
I’m totally in love with the dehydration function. I have to own up and let on that I have a dehydrator already. But and it’s a big but, it’s large and I have absolutely nowhere to put it, so it lives in its box under a pile of other boxes and never gets used. As we’ve already used this air fryer a lot and I know it will get used on a near daily basis, it’s almost as if we have the dehydrator for free.
Internal light
It has a light that you can turn on and off whilst cooking. This combined with the steam-resistant viewing window means I can actually see what’s going on without having to open the door. This is something I’ve never been able to do with my oven.
Top Dial
I’m really keen on the top dial that controls the temperature and time. There are preset buttons for this too, but the dial allows you to easily change the settings whilst food is cooking. Turn it one way to increase times or temperature and the other way to decrease them. It’s so easy to use.
Quiet
It’s a surprisingly quiet appliance. Not completely, obviously, but fans can be really noisy and this one isn’t too bad at all.
Easy to clean
The racks, mesh basket and drip tray all come out and I’ve washed them in the kitchen sink with no problem at all – so far! If you have a dishwasher, you can bung them all in there. Once everything’s removed it’s easy to wipe out the interior, although I haven’t needed to do that yet.
Lots of space
With three square shaped shelf racks, there’s a surprising amount of cooking surface. If you’re roasting veg, you can pack quite a lot in. The shape and twelve litre capacity allows me to use my 23cm (9 inch) square cake and roasting tins – hooray!
Best Puff Pastry Tarts
I know puff pastry tarts aren’t the healthiest of foods, but they are convenient to make. And I do indulge from time to time. Because of this fabulous air fryer, I’ve now created the best puff pastry tarts I’ve ever made.
I placed the pastry directly on the mesh racks, added a few toppings and then set the timer for twenty minutes and the temperature to 190℃. Because the air circulates right around the pastry, the whole thing was beautifully crisp. No sign of a soggy bottom anywhere. The tarts were so hot, we had to wait ten minutes for them to cool down enough to eat. The veg was cooked and the cheese melted.
And the big bonus? There was virtually no mess at all. I didn’t have to clean anything. The pastry came away from the racks beautifully and nothing had fallen on the drip tray.
What I Was Less Happy About
It’s impossible it seems, to be happy with absolutely everything. I have a few minor quibbles.
Instruction Manual
The instruction manual is pretty basic. I had a whole heap of questions which weren’t answered. For example I wanted to know if you had to preheat the air fryer. Annoyingly I couldn’t find any information on this nor how to do it if I wanted to. Ideally, I’d have preheated it before putting my cake into bake, but as I didn’t know how to do it, the cake went in to a stone cold appliance.
Meat Orientated
Both the manual and air fryer itself are quite meat orientated. Four of the eight presets are for animal products: steaks/chops, fish, shrimp and chicken. When so many people are wanting to eat more vegetables and less animal protein, this seems a bit of a shame.
Not that it can’t be used for vegan and vegetarian dishes. Far from it. It’s just not particularly encouraging.
Counter Space
It takes up more valuable counter space than my old air fryer. Although to be fair, it does more too. It’s dimensions are as follows: width = 31cm x depth = 32cm x hight = 39cm.
No Colour Choice
I’d have liked a choice of colours. It’s a glossy black and quite smart, but I’m not particularly keen on lots of black in my kitchen. To quote Henry Ford “any colour you like as long as it’s black”.
Oven Gloves
You need oven gloves to get at your food in most instances. This shouldn’t really come as a surprise and quite frankly, isn’t that inconvenient. But I rarely needed them for my old air-fryer, so I was just a bit taken aback.
Chips
Because of the rotating basket, I was expecting the chips to cook really fast. They took twenty five minutes, as opposed to twenty minutes in my old air fryer. Having said that, they tasted just as good and only need a teaspoon of oil.
Missing Recipe Booklet
The air fryer is meant to come with a recipe booklet, but I couldn’t find anything resembling this in the box. All I had was the rather skimpy instruction manual.
Innoteck 6 in 1 Air Fryer: The Verdict
I’m really excited by this innovative air fryer. The advantages far outweigh any disadvantages. It’s neat and pretty compact. As long as you have room for it on your countertop, it’s a terrific addition to one’s kitchen.
It cooks food faster, at lower temperatures and you can get away with using only a tiny amount of fat or even none at all. I’m really pleased with its multi-functionality and results. In fact I can’t wait to experiment with it some more.
What Are Prunes?
Prunes are, quite simply, dried plums. They’re sweet, succulent and chewy. In France, plums are called prunes and prunes pruneau, so it can get a bit confusing.
Prunes usually, but not exclusively, come from the European plum, Prunus domestica. One of the most famous is the Agen prune from France which comes from a plum variety named “Prune d’Ente”.
In order to make your own prunes, however, you can use any variety of plum, including greengages. They may not look like the prunes you buy, but they will still be highly nutritious and hopefully delicious.
Prunes are super healthy and just two of them count towards your ten-a-day. They’re full of gut-healthy fibre, phenols, vitamins and minerals.
They’re particularly good for bone health. Not only might they prevent bone loss, but they could reverse it too according to Shirin Hooshmand, PH.D., Professor of Nutrition at San Diego State University. Indeed on a Channel 4 TV programme, Superfoods: The Real Story, I noted that astronauts take prunes with them into space in order to keep their bones strong.
How To Make Your Own Prunes
You can dry plums in an oven, but it’s an expensive business, takes longer and you’ll need to leave the door of the oven slightly ajar. If making your own prunes is something you want to do on a regular basis, it’s definitely worth investing in a dehydrator. Or better still one of these fancy pants air fryers that double up as a dehydrator, like this Innoteck 6 in 1 Air Fryer Oven.
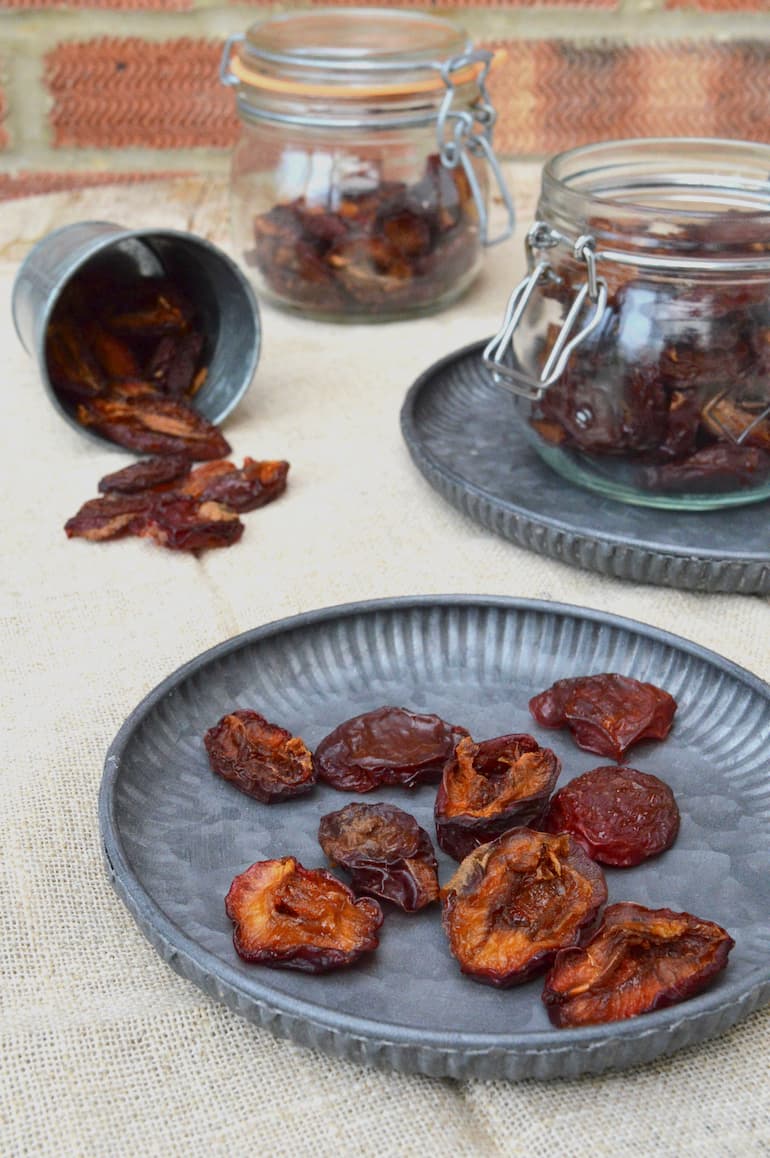
As the dehydrator does its work, a wonderful scent of plums emanates from it. Our house smelt quite intoxicating – bonus!
We managed to get thirty plums, making sixty plums halves, in the air fryer in one go. Although this means this particular air fryer is really only useful for small quantities, you can do several batches over a period of days. And really, what a great way to preserve an excess of plums.
How Long Do Plums Take To Dry?
How long you dehydrate your plums for very much depends on what type of plum you use, what you want them for and how long you want to keep them. They can take anywhere between ten and eighteen hours.
I like mine slightly squishy and found twelve hours in the air fryer was perfect.
If, like me, you want slightly soft plums for delicious snacks, you won’t need to dry them for more than twelve hours, though do check them after ten. They won’t, however keep for more than a few days unless your refrigerate or freeze them.
I keep mine in the refrigerator where they last well for a couple of weeks.
For longer term use you’ll need to dehydrate them for a few more hours and ensure no moisture comes out when you squeeze them. They will be darker, dryer and chewier, but it’s perfectly possible for them to keep for a year or more.
If you see any sign of mould, discard immediately.
Freestone And Clingstone Plums
Freestone plums are the ones where the stone comes away from the flesh cleanly and with relative ease. That’s the theory anyway. Clingstone varieties, on the other hand are pretty much what you’d imagine from the name. The stone clings to the flesh, making them awkward to pit.
When it comes to drying plums, freestone varieties are the easiest to handle. And if you have a lot of plums to pit this matters. Received wisdom has it, that Italian prune plums are particularly good. They’re very sweet and the stone comes away quite easily.
Clingstones varieties, such as greengages, are often the most delicious plums. They’re great for eating fresh, just as they are. However, when it comes to preserving, they’re not the easiest to process. But don’t be put off, although they’re considerably messier to pit, they can make delicious prunes.
I’ve used Victoria plums, which take quite a long time to dehydrate because they’re particularly juicy. Although they’re a freestone variety, we found it difficult to remove the pits cleanly in about half of the them. So the pitting process wasn’t quite as quick as I’d anticipated.
However, it can be a fun activity too. Gather the family around, put on some good music and have a race as to who can pit the most.
How To Dry Plums: Step-By-Step
Drying plums or making prunes is really very easy. It’s not a quick process though. However, once you’ve pitted the plums, your work is more or less over.
Step 1: Plum Preparation
Use ripe, but firm plums. Mushy plums will be hard to pit and won’t make the best prunes.
Try and get hold of a freestone variety if you can. Clingstone varieties take longer to pit and the process is a lot messier.
Wash your plums in cold water and place in a colander to drain. Take each plum and cut in half. There’s a natural line you can use. Give a gentle twist to separate the two halves. One side should come away cleanly and the other will hold the stone. Remove the stone.
This is assuming you have a freestone variety. Otherwise, cut the plums in half and then cut the stone away with a sharp knife.
Top Tip
Slice plums for a quicker drying time.
Step 2: Dehydrate Plums
Place the halves on the racks in a single layer cut side up. Make sure they’re not touching so that air can circulate around each plum half. But otherwise pack them in so that you can get as many as possible on the rack. They will shrink as they dehydrate.
Place the racks into the dehydrator and set the temperature to 60°C (140°F). Set the timer from somewhere between twelve and eighteen hours. How long exactly will depend on the type of plum, how juicy they are to start with and how dry you want them. Check them after the first ten hours, just in case.
You can see how much they shrink from the before and after photos.
Top Tips
The key is getting the temperature right. You don’t want the plums to cook, so the temperature needs to be low enough to preserve all those fabulous nutrients. You also don’t want the outside to dry too quickly or this may prevent the insides drying properly.
The best temperatures for dehydrating plums is thus somewhere between 45°C and 65°C (110°F and 135°F).
For more information on “how long do plums take to dry”, see the section further up the post.
How To Make Your Own Prunes In The Oven
If you don’t have this super Innoteck air fryer or any other dehydrator, you can use your oven. Your plums will take longer to dehydrate and become prunes though. Use the fan function, if you have one and set the temperature to 60°C or 140°F. Otherwise set it to 80°C.
Plums are big enough to set directly on oven racks. Set a tray underneath the rack to catch any drips.
Leave the door slightly ajar to allow moisture to escape.
It will take a little longer in the oven, but start checking your prunes after about twelve hours.
How To Use Your Prunes
Prunes make delicious snacks all on their very own. Combine them with some of your favourite nuts and seeds and you have your very own trail mix.
You can use prunes pretty much anywhere you’d normally use dried fruit. Snip them into small pieces and add to cakes and bakes, top your breakfast cereal with them or add some to smoothies. Prunes work quite well in savoury recipes too, think Moroccan tagines and British stews.
Prune Recipes On Tin And Thyme
- Black chickpea & red quinoa burgers with prunes
- Chocolate prune gingerbread loaf cake
- Fruit loaf with prunes, walnuts & honey
- Prune porridge topped with toasted walnuts & cinnamon
- Prune rock cakes
- Spiced prune chocolate pots with amaretto
Other Plum Recipes You Might Like
- Almond plum tart
- Plum & amaretti ripple ice cream
- Plum upside down cake
- Roasted plum parfait with lemon curd
- Rose plum yoghurt ice lollies
- Victoria plum cake with white chocolate
Keep in Touch
Thanks for visiting Tin and Thyme. If you have a go at making your own prunes, I’d love to hear about it in the comments below. And do please rate the recipe. Have you any top tips? Do share photos on social media too and use the hashtag #tinandthyme, so I can spot them.
For more delicious and nutritious recipes follow me on Twitter, Facebook, Instagram, Flipboard or Pinterest. And don’t forget to SUBSCRIBE to my weekly newsletter. Or why not join the conversation in our Healthy Vegetarian Whole Food Recipes Facebook Group?
If you’d like more equipment reviews, follow the link and you’ll find I have quite a lot of them. All just as I find them, of course.
Choclette x
How To Make Your Own Prunes. PIN IT.
How To Make Your Own Prunes – The Recipe
Prunes
Equipment
Ingredients
- 500 g ripe plums (I used 30 Victoria plums)
- nothing else required
Instructions
- Wash your plums in cold water and place in a colander to drain. Take each plum and cut in half. There's a natural line you can use. Give a gentle twist to separate the two halves. One side should come away cleanly and the other will hold the stone. Remove the stone.500 g ripe plums
- Place the halves on the racks in a single layer cut side up. Make sure they’re not touching so that air can circulate around each plum half. But otherwise pack them in so that you can get as many as possible on the rack. They will shrink as they dehydrate.
- Place the racks into the dehydrator and set the temperature to 60°C (140°F). Set the timer from somewhere between twelve and eighteen hours. How long exactly will depend on the type of plum, how juicy they are to start with and how dry you want them. Check them after the first ten hours, just in case.
Notes
Nutrition Estimate
Sharing
I’m sharing this how to make your own prunes guide with Casa Costello for #CookBlogShare.
Disclaimer: I’m not a nutritionist and you should always check any stated health claims.
I received a 6 in 1 Air Fryer Oven from Innoteck in order to review it. I was not expected to write a positive review and all opinions are, as always, my own. This post also contains affiliate links which are marked with an asterisk*. If you buy through a link, it will not cost you any more, but I will get a small commission. Thank you for your support of the brands and organisations that help to keep Tin and Thyme blithe and blogging.
I have a plum tree giving small green plums which are tart when cooked. I put them into the microwave on defrost setting for half and hour, cut the stones out and they did not dry but went gooey. Have they lost their nutriments by this treatment?
Hi Timothy, I don’t have a microwave and don’t really know much about them, but it sounds like you cooked your plums, which will have quite a different effect when you dehydrate them. Cooking will also have reduced some of the nutrients.
I have an Air Fryer similar to yours. It arrived with no books – supposed to go online to find out how to use it!!! So irritating! I bought it to replace my bench top oven that died on me. Wasn’t aware of the dehydrating feature (if it has it at all) but will look into that. Summer coming = plums = prunes.
Thanks Choclette for this very interesting article.
Good luck with the dehydration. Hope you can do it with your air fryer. Yes, it’s so annoying when they make you go online for instructions. Did you get this via my newsletter? I added the wrong link to my prune gingerbread recipe – oops!
Hi! Thanks for this “recipe”! Do you leave the skins on the plums when dehydrating?
Thanks again
Oh yes, absolutely. The thought of skinning all those plums makes me want to run away. Plum skins are quite thin, so they don’t intrude too much.
And from your own tree, they’re organic. Just try to find organic prunes in the store!
Yes very good point Margaret. Organic prunes are hard to get hold of indeed.
what an interesting idea to make your own prunes. i had never thought of doing it. and they are so good for you too…
They are really good for you and homemade are so very tasty.
What a fabulous idea! I also have a large dehydrator that I hardly ever use, this is a fab compromise. The prunes look fantastic, we eat a lot of prunes so I’ll have to try this.
If you have access to lots of plums Janice, it would be worth getting out your large dehydrator. I can only do 30 at a time in this one. Not that I’m complaining. It worked really well.
Now I’m pretty sure that I know that prunes are dried plums but I had definitely forgotten and my world has again been rocked! I bought a plum tree this spring so I’m a while off a glut but I’ll feel be trying this is at point!
Ooh a plum tree. That is exciting Chloe. You’ve now got years of making your own prunes to look forward to.
Absolutely the best recipe! I love how simple it is to make these prunes! Thank you!
So simple and so satisfying. Glad you’ve found it useful.
Thank you for sharing the air fryer review, I definitely need to invest in one. I had no idea how versatile it is and how many different functions it has. I can’t wait to make my own prunes. Store bought often contain artificial preservatives and sulphites so making your own is so much healthier and such a great way to use up left over plums. Thank you for sharing the recipe.
Yes, I totally agree, homemade are usually healthier than store bought. And they taste so good too. I’d be lost now without our air-fryer. This one is new, but we’ve used one for years. It obviously depends on which type you get though as to whether you can use it as a dehydrator.
I’ve never been that tempted by an air fryer but one that dehydrates too is very tempting. As for homemade prunes they sound yummy. Sadly will have to wait another year as my plum harvest was tiny this year.
Oh boo, that’s annoying Jacqui. But, on the bright side, it’s always good to have something to look forward to. I think I’m more excited by the dehydrate function than I am by anything else with this air fryer.
Somehow I’d never thought to have a go at making prunes in my air fryer. It’s definitely something I’d love to have a go at now. They look so much nicer than bought prunes.
They’re really delicious, but I guess it depends on what plum you use. One of the good things about making your own is that you can make them semi dry, really dry or something in between.