How To Make Homemade Butter
Homemade butter is a simple and delicious alternative to shop-bought butter. All you need is double (heavy) cream, a few basic kitchen tools and fifteen minutes. You can even make it with just a jam jar. It’s a fun activity and highly satisfying. Make soda bread with the leftover buttermilk if you like. A recipe is included.
This post may contain affiliate links. As an Amazon Associate, I earn from qualifying purchases. See my cookie and privacy statement for further details.
When I see a large pot of double cream reduced because of its sell-by-date, I just can’t help myself. I have to buy it and make butter.
Dive Right In
- Why Make Your Own Butter?
- How to Make Homemade Butter
- Homemade Butter In A Jar
- Flavoured Butter
- What To Do With Leftover Buttermilk?
- FAQs
- Recipes In Which To Use Your Homemade Butter
- Keep In Touch
- The Recipe
Why Make Your Own Homemade Butter?
Making butter is one of those grounding experiences which just enhance your mood and make you feel ever so slightly clever.

Here are a few more reasons why you might consider making homemade butter:
- Cost-Effective – Making butter at home can be a cost-effective option. This is especially true if you buy cream when it’s close to its use-by date and thus reduced in price. Even if you buy full price cream, it costs about the same as a standard pack of commercial butter. BUT you get the added bonus of free buttermilk.
- Flavour – Homemade butter just tastes better than the stuff you buy in shops. It’s creamier and fresher tasting somehow. But the main benefit is that you can add as much salt as you like to suit your own preferences, or no salt at all.
- Fun Activity – Making butter at home can be a fun activity to do with friends and family. And it’s a great way to teach children about where their food comes from.
- Healthier – You have control over the ingredients used in making homemade butter, so you can use high-quality cream from grass-fed cows or even raw cream if you can get it. These can result in a healthier product with more beneficial nutrients.
- Sustainable – If you use organic cream or buy it from local farmers or producers, it can support sustainable and ethical practices in agriculture.
- Zero Waste – When you make butter at home, you can use the leftover buttermilk. It’s useful for baking and cooking or you can just drink it. It’s also a great way to use cream quickly before it goes off.
How To Make Homemade Butter
It takes a surprisingly small amount of time to make butter. Around fifteen minutes from start to finish is all you need to have a ball of butter on the table. This doesn’t, however, factor in clean-up time. A large 600ml (2 ½ cups, 20 fluid oz) pot of cream produces a slab of butter that’s slightly bigger than a standard 250g (½ pound) pack.
If you’d like to have a go at making homemade vegan butter, I have a recipe for that too.
Step 1. Churn Butter
First you need to churn the butter. Now we have electric mixers it’s a lot easier to do than it used to be. Having said that, you can indeed make butter in a jar. However, it takes quite a bit of time and is hard on the arm. It’s much easier to use an electric mixer.
Pour the cream into a large high sided bowl, if using a hand held mixer. Otherwise pour it into the bowl of your stand mixer. I sometimes use my Kitchen Aid* and sometimes my Kenwood Chef hand mixer*. They both have their merits. I know some people use a food processor, but I’ve never tried it.
Whip the cream until it turns into soft and then firm peaks. This means you’re getting close. Then just keep on whisking until the solids separate from the liquid. The solids turn into little globules of yellow fat which rise to the top. The remaining white liquid is buttermilk.
For fastest results, beat on high speed, but if you’re using a stand mixer and it has a cover, use it. You’ll find the butter and buttermilk spread themselves around. The whole process takes around four to five minutes.
Top Tip
Cold cream is easier to whip than warm cream, so keep it in the fridge until you need it. And the colder your equipment, so much the better.
Step 2. Strain Buttermilk
Line a sieve with a muslin cloth*. If you don’t have either of these, a clean cheesecloth, handkerchief or fine mesh bag should work. Place the lined sieve over a bowl or wide-necked jug.
Pour the contents of the bowl through the lined sieve to strain out the buttermilk.
Pick the ends of the cloth up and twist it tight, squeezing as much of the liquid into the bowl as you can.
Keep the buttermilk, including any bits of butter that might be left in it. It’s really useful stuff and good for you too. You’ll find a recipe for soda bread in the recipe card at the bottom of this post.
Top Tip
You can just use a sieve* and squeeze the butter with your hands, but I find it much easier to use a muslin cloth. This not only makes it easier to squeeze out the buttermilk but also gives the butter a nice shape. It also means, if you’re lazy like me, there’s no need to shape it after squeezing.
Step 3. Wash Butter
Washing butter may seem a little odd, but you need to get rid of any remaining buttermilk. This prevents it going rancid.
Fill your mixing bowl with cold water, then place your ball of butter in it. Squeeze the butter with your hands a few times to remove any residual buttermilk.
If the water is really cloudy, throw it away and repeat. Alternatively, rinse under a running tap until the water runs clear.
Top Tip
Make sure you use cold water or the butter might melt. If your water or hands feel a bit warm, add ice cubes to the water.
Step 4. Add Salt (If Using)
Place the butter into a bowl. Add the salt and mash tit into the butter with a fork. Or cream it with a wooden spoon, if you prefer.
I like to use fine sea salt so the whole pat of butter is very slightly salty. But use sea salt flakes if you prefer bursts of crunchy saltiness.
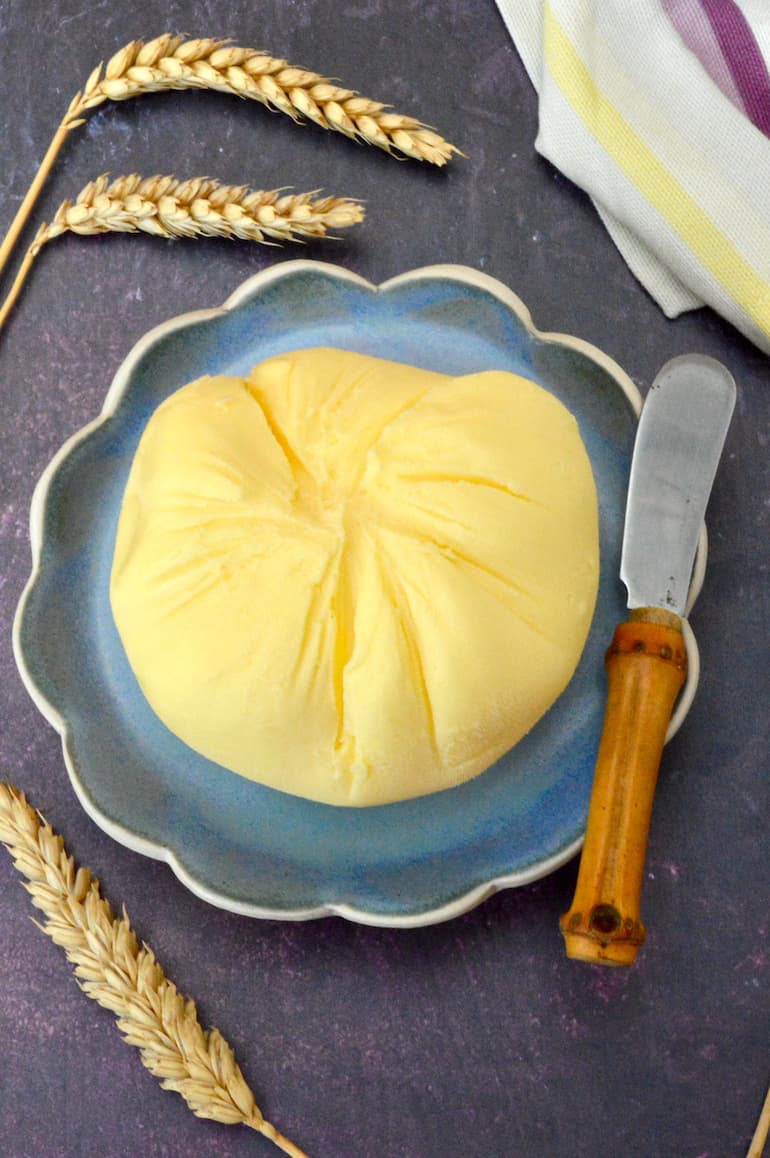
Step 5. Shape Butter
Place the butter back into the muslin cloth, twist and squeeze as before. This will get rid of any remaining moisture and shape your butter into a ball.
That’s as far as my shaping goes. It’s partially laziness, but mostly just because I like the shape of the butter once it’s been squeezed in a cloth.
You can shape the butter in any way you like. The easiest one is probably a roll. You can form it into a neat roll using a piece of greaseproof paper. You can then use that same piece of paper to wrap it before storing in the fridge. Alternatively press your butter into a butter dish or butter moulds.
If you have butter pats, so much the better. I don’t. Use them to shape your butter into a rectangle or square. They’ll also remove any excess moisture as you pat.
Homemade Butter In A Jar
All you need is some double (heavy) cream, a large jar with a tight fitting lid, and some elbow grease. Just pour the cream into the jar, close the lid tightly and shake. This method is best used for small amounts. Alternatively, share the task with friends and family.
It’s a wondrous process. I still remember the excitement of making butter in a jar when I was a kid. Just keep shaking that cream until it turns to butter. The magic doesn’t lose its lustre despite all our modern smart technology.
The secret, which I didn’t know about as a child, is to add a marble to the jar. This sort of acts as a whisk and speeds things up no end.
Flavoured Butter
Making your own homemade butter gives you the perfect opportunity to make flavoured butter. Whilst it’s still soft transfer to a bowl. Add your chosen flavour or flavourings and mash everything together with a fork. Then shape as desired, wrap or cover and pop it into the fridge.
Here are a few simple flavour suggestions that we like. To 100 grams of butter, add:
- Chilli Butter – ½ a teaspoon of dried chilli flakes and a pinch of fine sea salt
- Garlic Butter – 1 clove minced garlic, 2 teaspoons of finely chopped parsley and a pinch of fine sea salt
- Nasturtium Butter – Use a whole batch of salted butter for this one. Flatten the butter into a rectangle, cover with nasturtium leaves and flowers, then roll up tightly with the aid of a sheet of greaseproof paper. Chill, then cut into slices.
- Seaweed Butter – 2 grams of nori seaweed flakes and a pinch of sea salt flakes
- Smoked Paprika Butter – 1 teaspoon hot smoked paprika and a pinch of fine sea salt
- Honey Butter – 1-2 tbsp – firm honey is better, but you can use runny honey too. Add a small pinch of sea salt if butter is unsalted
- Maple Syrup Butter – 2-3 tbsp and a small pinch of sea salt if butter is unsalted
Or have a go at my chilli, lime and coriander butter recipe. It’s delicious and the one I make the most.
What To Do With Leftover Buttermilk?
Although buttermilk, as in the byproduct of making butter, isn’t the same as the cultured buttermilk you buy in cartons, it’s a great ingredient to use in many bakes. And it has a similar effect.
I usually make a quick soda bread with the leftover buttermilk. It’s very easy and tastes delicious. I’ve included a recipe which works with the buttermilk you should get from making this amount of homemade butter.
However, it’s also great for making scones, pancakes and cakes. In fact you can use it in most recipes as a direct replacement for milk. Here are a few recipes in which you can use your buttermilk.
- Chocolate lime cake
- Irish apple cake
- Plum upside down cake
- Triple chocolate muffins
- Welsh pancakes
- Wild garlic cheese scones
FAQs
To make homemade butter you need cream with a high fat content. Double (heavy cream) is the one to go for. I’ve heard that whipping cream works, but I’ve not tried it. Single cream won’t work.
Homemade butter won’t last as long as shop bought butter, but if you cover or wrap it, it will keep for a week in the fridge. If you add salt, it will keep longer. Add a quarter of a teaspoon to the amount of butter produced in this recipe and it will keep for two to three weeks at room temperature. This is too salty for me though.
Alternatively freeze your butter. If properly made, it will keep for six months. Place it in the fridge the day before you need it so it can thaw overnight.
Removing buttermilk from homemade butter is important for preserving the butter. The more you get rid of, the longer your butter will last. Rinsing or washing the butter before storing helps to remove any residual buttermilk.
There are two types of buttermilk.
The whey leftover from making traditional butter is also called buttermilk. This is not inoculated with bacterial cultures and is therefore much thinner and less sour than cultured buttermilk. However, it has a good flavour and is excellent for baking and cooking.
The buttermilk made from homemade butter won’t keep as long as the cultured buttermilk you buy in shops. Pour it into a covered jug or bottle and store it in the fridge. It will keep well for at least three days.
You can also freeze it for later use for up to three months.
Homemade buttermilk is low in fat and a good source of protein. It also offers an excellent supply of vitamin B12, riboflavin, calcium, potassium and phosphorus. In addition it’s a probiotic and thus good for gut health.
Recipes In Which To Use Your Homemade Butter
The best use of homemade butter, in my opinion, is to spread it on some freshly baked bread. But homemade butter is just like any other butter and you can use it in a myriad ways. Here are a few suggestions:
- Brown butter biscuits
- Chocolate whisky cakes with chocolate buttercream
- Honey butter glazed carrots
- Roasted squash with sage and hazelnuts in brown butter
- Rum & raisin cupcakes
- Viennese whirls with vanilla buttercream
Keep in Touch
Thank you for visiting Tin and Thyme. If you have a go at making homemade butter, I’d love to hear about it in the comments below. Do you have any recommendations or advice for making it or using the leftover buttermilk?
I’d very much appreciate it if you could rate the recipe. If you post pictures of your creations on social media, please use the hashtag #tinandthyme so I can see them.
For more delicious and nutritious recipes follow me on Twitter, Facebook, Instagram, Flipboard or Pinterest. And don’t forget to SUBSCRIBE to my weekly newsletter. Or why not join the conversation in our Healthy Vegetarian Whole Food Recipes Facebook Group?
If you’d like more recipes for spreads, follow the link and you’ll find I have quite a lot of them. All delicious and nutritious, of course.
Choclette x
How To Make Homemade Butter. PIN IT.
How To Make Homemade Butter
Equipment
- stand mixer (affiliate link) optional
- electric beaters (affiliate link) optional
Ingredients
Butter
- 600 ml double cream (heavy cream) fridge cold
- 1 pinch fine sea salt (optional)
Soda Bread (optional)
- 180 g wholemeal flour (whole wheat)
- 180 g plain flour (all purpose flour)
- ¾ tsp bicarbonate of soda
- ⅓ tsp sea salt
- 1 tsp treacle or swap for honey
- buttermilk
Instructions
Butter
- Place the cold cream into a large bowl or the bowl of a stand mixer.600 ml double cream (heavy cream)
- If using a stand mixer whip the cream with the whisk attachment until it forms peaks. Otherwise, beat with a handheld mixer.
- Keep whipping the cream on high until it separates out and liquid forms. The butter will rise to the top. It looks very messy, but don’t worry. The whole process takes around five minutes.
- Line a sieve with a muslin cloth and place it over a wide jug or bowl. Pour the contents of the butter bowl into the sieve.
- Allow the buttermilk to drain through, then gather up the muslin cloth, twist the top and squeeze out as much of the liquid into the jug as you can.
- Fill your mixing bowl with cold water. Take the butter out of the cloth and place it in the bowl. Squeeze the butter with clean hands a few times to wash it through. This is important as any buttermilk left in the butter will cause it to go off faster.
- If the water is really cloudy, throw it away and repeat. Alternatively, rinse under a running tap until the water runs clear.
- Place the butter back in the muslin cloth, twist the top and squeeze as much of the water out as you can. This time, don’t squeeze it into the buttermilk jug.
- Unwrap the cloth and there you have it, homemade butter. Either leave it just as it is and place in a covered dish or shape it with butter pats or cold hands into a rectangle.
- If adding salt, mash it into the butter at this stage with a fork. Alternatively use the creaming method with a wooden spoon to mix it.1 pinch fine sea salt
- Keep the buttermilk to make the soda bread below or use in other baking.
Soda Bread (optional)
- Place the flours, bicarbonate of soda and salt in a large mixing bowl. Stir together, then make a well in the middle.180 g wholemeal flour (whole wheat), 180 g plain flour (all purpose flour), ¾ tsp bicarbonate of soda, ⅓ tsp sea salt
- Pour most of the buttermilk into the well and add the treacle. Work the liquid into the flour with a flat bladed knife, then bring the dough together with your hands. You want a very slightly sticky dough, so add more buttermilk if needed. I used all of mine. Alternatively use the dough hook on an electric mixer.1 tsp treacle, buttermilk
- Knead the dough briefly and then form into a round ball. Just like scones, soda bread is better for a lighter touch.
- Grease or line a baking tray. Place the ball of dough on the tray, then flatten it a little and mark a deep cross into it with a sharp knife.
- Bake at 220℃ (200℃ fan, 425℉, Gas 7) for 30-35 minutes. The loaf is done when it's golden all over and the base sounds hollow when you tap it.
Notes
Nutrition Estimate
This post contains affiliate links which are marked with an asterisk* or (affiliate link). If you buy through a link, it won’t cost you any more, but I might get a small commission. Thank you for your support of the brands and organisations that help to keep Tin and Thyme blithe and blogging.
I never made Homemade butter before but i can’t wait to try this out on the weekend. It looks like a dream and so smooth!
Oh yes, you have to try homemade butter Nancy. I think you’ll like it.
A very simple and satisfying alternative to store bought butter.
Exactly this Cindy.
we once made butter quite accidentally by whipping cream too far. Nice to have it ‘homemade’.
Hahaha, yes, I have been known to make butter by accident too – on more than one occasion!
I do make my own butter but just for spreading on bread or scones etc. Or to plop it into the beans with pepper!
But my only difference to your recipe is that I add the salt to the cream before mixing. My Mum used to do it so I follow!
So nice to produce a lovely big blob of butter. :))
A big blog of homemade butter really is very nice. The thing about adding salt with the cream is that you end up with salted buttermilk. This is fine if you want to make soda bread with the buttermilk afterwards, but it’s not suitable for ell uses. Now you’ve got me thinking of a lovely plate of buttery peppery beans.