The Easiest Swirled Chocolate Bark Recipe Ever
Homemade chocolate bark is one of life’s joys. Whilst not exclusive to Christmas, it’s great for festive parties, after dinner treats or gift giving. This swirled chocolate bark recipe really is the easiest one ever. It’s a simple technique which gives great results and requires absolutely no melting of chocolate in bowls.
Now December is here, I’m starting to get into the festive spirit. I’ve been thinking about this year’s homemade edible gifts. Chocolate bark is always a strong contender. It’s relatively easy, lasts a while and it looks good. And this year I have an easy peasy technique for you that means it’s even simpler to make.
I already have a Christmas chocolate bark recipe on Tin and Thyme, but this one works for any time of the year.
Contents
- Why Make Swirled Chocolate Bark?
- Swirled Chocolate Bark
- Ingredients
- How To Make Swirled Chocolate Bark
- Chocolate Bark Toppings
- Swirled Chocolate Bark FAQs
- Other Homemade Chocolate Recipes You Might Like
- Keep In Touch
- The Recipe
Why Make Swirled Chocolate Bark?
If you’ve not made chocolate bark before, or even if you have, there are several reasons why you should try my swirled chocolate bark recipe. Here are a few of them:

- Fun for Kids – The recipe is simple enough for kids to make this recipe, though they might need a bit of help with the oven part. Swirling the different chocolates together is fun and they will love adding their favourite toppings.
- Homemade Gifts – Homemade chocolate bark makes for a delightful gift. Whether it’s for Christmas, a birthday or special occasion, recipients usually appreciate receiving a thoughtful, handmade treat.
- Quick Preparation – Hands on time for this marbled chocolate bark recipe is actually very little. This makes it a great option for those who want to whip up a delicious treat or gift but are short on time.
- Simple Technique – This easy easy peasy recipe for swirled chocolate bark uses an oven rather than the more traditional melting chocolate in a bowl. Or several bowls in the case of three different chocolates. They all go in together on one tray and then it’s just a case of swirling them together.
- Versatile – This chocolate bark recipe is so versatile. You can use whatever type or flavours of chocolate you like. Leave it simple or go mad with toppings of your choice. Have fun and play around with it.
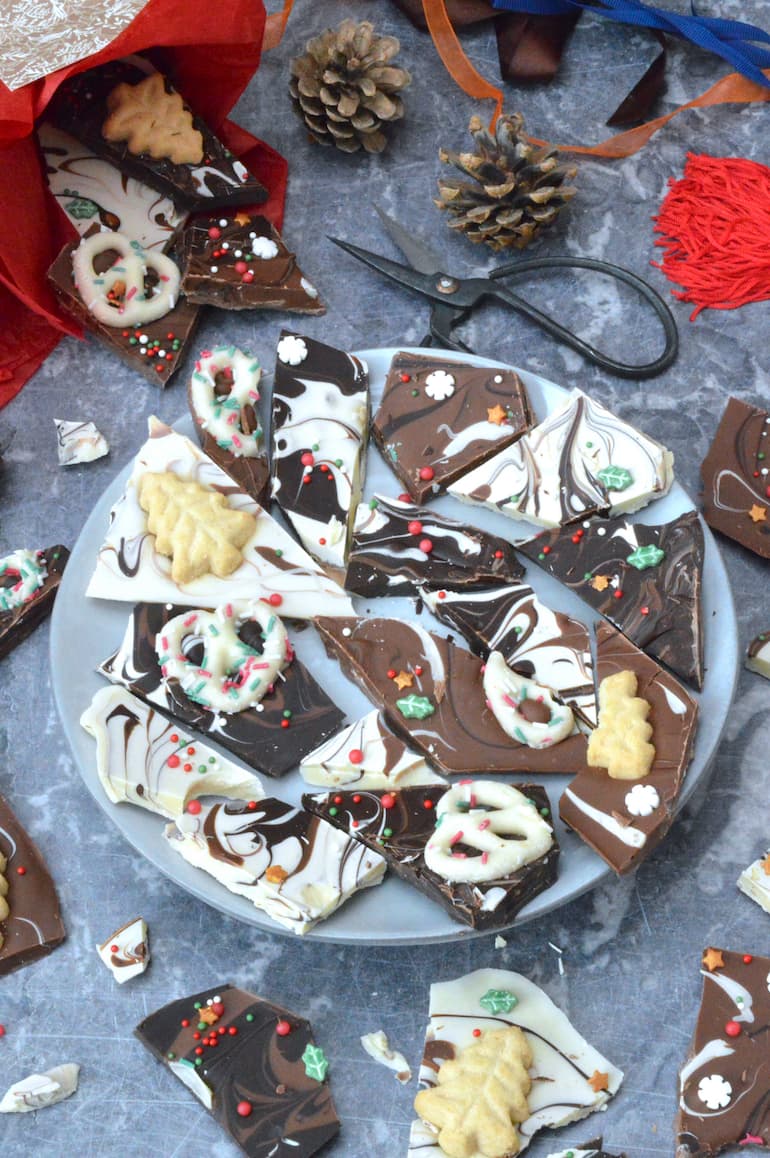
- Visual Appeal – The swirled effect adds a visually appealing element to the chocolate bark. The colours of milk and dark contrast really well with the white chocolate. This makes it an attractive option for parties and gatherings as well as gifts. After all everyone loves chocolate.
Swirled Chocolate Bark
To make this swirled chocolate bark, you’ll need three large chocolate bars, one dark, one milk and one white. Although it’s true white chocolate is very sweet and can be a bit sickly, it’s dramatic effect when swirled with the darker bars makes it an absolute must. And children seem to love it.
In fact a bag of this marbled chocolate bag makes an excellent family gift as the kids will love the white and milk parts of it whilst the adults might prefer the darker shards.
In an ideal world we’d all know how to temper chocolate and have the time to do it. Tempering chocolate is a fiddly business, but key to keeping chocolate snappy and shiny.
Chocolate bark made with tempered chocolate will store for a long time. But most of us just don’t have the headspace for it, let alone the time needed.
My easy peasy technique is to melt the chocolate slowly from a cold oven. Yes you heard that right – an oven. Normally you wouldn’t put chocolate in an oven. It’s very heat sensitive and burns quite quickly in high temperatures.
But because you don’t let the chocolate get too hot, it sort of stays in temper. This lot looks just as good today as it did when I made it five days ago. Just keep it in an air tight container in a cool place. Best not to store it in the fridge though.
Ingredients
The only ingredient you really need to make swirled chocolate bark is chocolate. However, there’s a bit more to it than that.
For this recipe you’ll need three large chocolate bars, one dark, one milk and one white. Having said that, you can mix and match. Try two bars of white with one of black in the middle, or two bars of milk with white in the middle.
The quality of the chocolate matters. The better the quality, the more likely it is to stay looking good once you’ve made the bark.
I used cooking chocolate, sometimes referred to as couverture chocolate. This generally has a little more cocoa butter in it than normal chocolate bars, which means it’s better for melting. It doesn’t have to be expensive though. I used a supermarket’s own brand.
How To Make Swirled Chocolate Bark
Swirled chocolate bark is super quick and easy to make. Unwrap the bars, pop in the oven for a few minutes, then draw a knife or skewer across the three bars to marble them together. Job done – sort of!
You’ll find ingredients and full instructions in the recipe card at the bottom of this post.
Step 1. Unwrap Bars
Line a small baking tray, measuring with unbleached baking paper.
Unwrap the three bars of chocolate and place them slightly apart on the baking tray. They will merge together as they melt.
What order you do this in is up to you. I wanted the dark chocolate in the middle so that it got more of the sweeter milk and white mixed into it than it might do if placed at one end. However, if you place the white in the middle, you might get more dramatic swirls.
Step 2. Melt Chocolate
Place the tray in the middle of a cold oven, then turn it on. The trick to keeping the chocolate shiny is not to over heat it. Use a conventional electric oven setting if you can. I’ve not tried this in a fan oven, so I don’t know if it will work.
Set the timer for ten minutes. Check on the chocolate at this point to see if it’s melted. Exactly how long it takes will depend on how quickly your oven heats up and how thick your chocolate bars are.
Once melted, remove the chocolate from the oven. If it’s not quite there, leave it for a further two to five minutes or until it has melted.
Top Tip
You may not be able to tell if the chocolate has melted completely just by looking, so stick a skewer the dark bar to check. The dark bar will take a bit longer to melt, so make sure it has.
Step 3. Swirl Chocolate
Remove the tray from the oven and place on a board. It shouldn’t be so hot that you can’t handle it. As soon as you’ve done this, swirl the chocolates together using a skewer or knife. Keep going until you’re happy with the result.
I tried for more of a swirl effect than a marble one as I wanted to keep the three bars somewhat distinct. But how much you mix them up is entirely up to you.
Step 4. Decorate
If you choose to keep your swirled chocolate bark pure and unadorned, skip to step five.
Otherwise press your chosen toppings lightly into the chocolate whilst it’s still in a melted state. Likewise scatter any sprinkles over the top at this point.
Top Tip
You can cover up any inexpert swirling with larger toppings, such as shortbread biscuits.
Step 5. Set And Cut
Place the tray in a cool place to set. Don’t use the fridge, however, as it might cause the chocolate to bloom or go dull. It will take anywhere between half an hour and an hour to set, but do make sure it’s hard before trying to cut it or break it up.
Once the chocolate is hard, place it on a chopping board then use a knife to cut the bark into irregular shards or pieces. It tends to do this naturally anyway once you set a knife to it. If you try to break it with your hands, you’re likely to spoil it with finger marks.
Place the swirled chocolate bark pieces in an airtight container and keep somewhere cool. They should look good for at least a week. If gifting, divide the chocolate up and pop into cellophane gift bags, tins or suitable boxes. Tie up with ribbons and pretty gift tags. And again, store in a cool place.
Chocolate Bark Toppings
When it comes to chocolate bark toppings, there are so many options. Just go with what you fancy or think looks nice. In case you’ve drawn a blank, and it happens to the best of us, here are a few ideas.
- Candy canes – crushed or whole
- Chocolate buttons in coloured shells, such as Smarties or M&Ms
- Dried fruit – mixed or a single type such as cranberries
- Fudge – chopped or crumbled
- Glitter – just make sure it’s edible
- Honeycomb pieces
- Mini salted pretzels – plain or chocolate coated
- Mini shortbread biscuits
- Popping candy
- Roasted nuts – chopped or whole
- Sea salt flakes – don’t use too many
- Sprinkles – whatever grabs your fancy
Swirled Chocolate Bark FAQs
If you follow the directions for my swirled chocolate bark recipe, it will keep well for at least a week, probably a lot longer. Store in a sealed container in a cool place, but not the fridge.
Don’t worry if the chocolate develops a white bloom. This is normal for chocolate that’s been melted but not tempered. It doesn’t look as pretty but it’s still okay to eat. Follow my instructions and this shouldn’t happen.
It’s fine to use any combination of milk, white or dark chocolate for this bark. Dark chocolate, for example balances out the sweetness of white chocolate. But if it’s for kids you might want to leave out the dark and go for a mix of milk and white.
Flavoured chocolate is fine too. Just try to use a good quality one. If your chocolate is thinner because you’re using smaller bars, it won’t take as long to melt. Check after the first seven minutes.
Other Homemade Chocolate Recipes You Might Like
- Candied orange peel dipped in chocolate
- Chocolate Brazils
- Gingerbread chocolate truffles (vegan)
- Passionfruit caramel chocolates with rosemary
- Peppermint cracknel with toasted coconut
- Whisky truffles
Keep in Touch
Thank you for visiting Tin and Thyme. If you make this easy oven method chocolate bark recipe, I’d love to hear about it in the comments below. Do you have any recommendations or advice for melting chocolate?
Please rate the recipe. If you post pictures of your creations on social media, use the hashtag #tinandthyme so I can see them.
For more delicious and nutritious recipes follow me on Twitter, Facebook, Instagram, Flipboard or Pinterest. And don’t forget to SUBSCRIBE to my weekly newsletter. Or why not join the conversation in our Healthy Vegetarian Whole Food Recipes Facebook Group?
If you’d like more homemade gift recipes, follow the link and you’ll find I have quite a lot of them. All delicious and nutritious, of course.
Choclette x
Easy Peasy Swirled Chocolate Bark
The Easiest Chocolate Bark Recipe Ever
Ingredients
- 180-200 g white chocolate one large bar (I used cooking chocolate with 25% cocoa solids)
- 180-200 g milk chocolate one large bar (I used cooking chocolate with 32.5% cocoa solids)
- 180-200 g dark chocolate one large bar (I used cooking chocolate with 72% cocoa solids)
- toppings of your choice see note below
Instructions
- Line a small baking tray, measuring 30cm x 23cm (12 inch x 9 inch), with unbleached baking paper.
- Unwrap the three bars of chocolate and place them slightly apart on the baking tray. What order you do this in is up to you.
- Place the tray in the middle of the oven and turn it on to 50℃ (120℉). Set the timer for ten minutes. Exactly how long it takes will depend on how quickly your oven heats up and how thick your chocolate bars are.
- Check on the chocolate at this point to see if it’s melted. If it has, remove from the oven. If not, leave for a further 2-5 minutes or until it has melted.
- As soon as the chocolate is out of the oven, swirl the chocolates together using a skewer or knife. Keep going until you’re happy with the result.
- Press any toppings lightly into the chocolate whilst it’s still in a melted state. Likewise scatter any sprinkles on top.
- Place the tray in a cool place to set. Don’t use the fridge, however, as it might cause the chocolate to bloom or go dull. It will take anywhere between half an hour and an hour to set, but do make sure it’s hard before trying to cut it or break it up.
- Once the chocolate is hard, use a knife to cut the bark into irregular pieces. It tends to do this naturally anyway once you set a knife to it. If you try to break it with your hands, you're likely to spoil it with finger marks.
- Place in an airtight container and keep somewhere cool. It should look good for at least a week. If gifting, wrap the chocolate in suitable bags, tins or boxes and again, store in a cool place.
I followed the instructions perfectly, used Lindt white chocolate and milk chocolate. However, it did not set firmly after allowing it to cool for several hours. Could it be the humidity? I’m in Texas and the outside temperature was 80 F inside temperature 72 today on December 12. Any suggestions on how to use the semi-firm chocolate? Thank you.
Hi Nancy, how very frustrating, especially when chocolate is so expensive now. Yes, it sounds like the temperature that’s the issue. Chocolate likes cool temperatures. Have you tried putting it in the fridge? I wouldn’t normally recommend that for chocolate, because it doesn’t like it really cold either. But in this case it sounds the better option. Otherwise, I’d just melt it and make something like brownies or tiffin with it.
My chocolate didn’t melt enough to delirium it was still hard on top after 3×6 minutes 2 c 7 mins snd 1 c 10 mo d why I had oven on 100 then 120 degrees
Weird
Hi Janet. Sorry to hear your chocolate didn’t melt. Chocolate can be a tricky customer. It may be the chocolate you used. Some melt much better than others. Cooking chocolate (couverture or chef’s chocolate) are the best ones to go for. It could also be that your oven was too hot. Oven’s aren’t always accurate in their heat settings. Better to go cooler and leave the chocolate in for longer.
This recipe was so fun to make! I never knew how this swirl pattern was created … until now! I topped mine with crushed candy canes and it was lovely!
Crushed candy canes is always a winner. Glad you had fun making swirled chocolate bark.
yes i love this oven melting method too! But I only put it in the oven for a couple of minutes at 180C – works a charm Merry xmas to you.
Oh that’s interesting Sherry, quite different in terms of time and temperature. Does it keep well?