Pickled Chilli Slices: Quick, Spicy And Full Of Flavour
Sweet, sharp and spicy, these homemade pickled chilli slices are quick and easy to make. They keep for ages and add pops of flavour to whatever you add them to. Try them on pizzas, in grain or noodle bowls, sandwiches, salsas and alongside your favourite Asian or Mexican dishes.
Although we grow our own rocoto chillies and always have plenty of them, it’s fun to try a few others from time to time. This year it was the turn of ohnivec, Nigel’s outdoor chilli and pretty in purple. I’m also growing cayenne as a house plant.
Dive Right In
- Why You’ll Want To Make Pickled Chilli Slices
- Ohnivec chillies
- Ingredients, Additions And Substitutions
- How To Make Pickled Chilli Slices
- What To Eat Pickled Chilli Slices With
- Other Other Ways To Use Lots Of Chillies
- Keep In Touch
- Pin It
- The Recipe
Why You’ll Want To Make Pickled Chilli Slices
- Adds instant flavour – a quick way to spice up dishes and add pops of flavour to almost anything.
- Easy homemade gift – makes a lovely present for any friends or family who enjoy a bit of heat.
- Homemade tastes better – you can fine-tune the sourness, sweetness and heat levels to your liking. Just choose a mild, medium or hot chilli as appropriate.
- Keeps for weeks – a brilliant fridge staple that stays fresh and flavoursome for ages.
- No special equipment needed – just a saucepan and a clean jar.
- Quick to make – takes only minutes to prepare and then improves as it rests.
- Reduces food waste – if you grow your own chillies, this is a great way to preserve a glut.
- Simple ingredients – just chillies, vinegar, salt and a touch of sugar and spice.
- Versatile condiment – much easier to use and eat than whole pickled chillies. They’re delicious in sandwiches, burgers, tacos and salads as well as with dips, noodles or cheese boards.
Ohnivec Chillies
Ohnivec is a long fleshy Eastern European chilli, which goes from pale green to yellow to orange to red. It gets hotter with each colour change and when fully ripe it packs a bit of a punch.

I’m now totally in love with this chilli. Not only is it ideal for making pickled chilli slices but it’s also good for general cooking. Although it’s hot, it’s classified as a mild to mid-range and is not as fiery as its name suggests. The name means ‘the fiery one’ in Czech.
What makes it even more special is that it’s not only easy to grow, but it’s a prolific producer too. You won’t need many plants to keep you well supplied. In theory they can grow to a foot long (30cm), but ours were about 20cm (9 inches), which feels just about right. They look impressive on the plant too.
Ingredients, Additions and Substitutions
As already stated, you don’t need much to make these pickled chilli slices. In addition to the ingredients highlighted below, you only need water.
Chillies
Really, you can use any type or colour of chilli you like, but I’d suggest going for something long and fleshy in the mid-range in terms of heat. As a general rule, the redder the chilli, the higher it will be on the Scoville scale.
I’ve used ohnivec, but other chillies that are particularly good for making pickled chilli rings are: jalapeños, guajillo and Hungarian hot wax. None of these are super hot, but should give a bit of a kick.
Salt
Use sea salt or pickling salt if you can. Table salt has anti-caking agents added to it and these might turn the vinegar liquid cloudy. I’ve also heard it adds a certain bitter element, but I’ve not tried it, so I can’t verify this.
Spices
Adding spices to pickles can either enhance or overpower the flavour of the fruit or veg you’re trying to preserve. For these pickled chilli slices, I’ve gone easy on the spices as I want the flavour of the chillies to shine.
I’ve used bay leaves, coriander seeds and just a few fennel seeds. However, if you’d like to try something different or extra, here are a few others that work with chilli:
- allspice berries
- cardamom pods
- dill seeds
Vinegar
As long as your vinegar is at least five percent acidity, you can use any type you like. It’s the acid that helps to prevent the growth of botulinum bacteria. Check your bottle before buying.
Having said that a pale vinegar is best as it’s less likely to colour your chillies. I like to use apple cider vinegar for pickling as it’s relatively mild and has a nice fruit flavour that melds well with both fruit and vegetables.
How To Make Pickled Chilli Slices
There’s something deeply satisfying about having a jar of homemade pickled chilli slices in the fridge. They instantly brighten other foods and just a few slices can lift a whole dish.
They’re also incredibly easy to make. With just a few basic ingredients and a handful of fresh chillies, you can create a colourful, tangy condiment that keeps for weeks.
Please refer to the recipe card at the bottom of this post for cooking temperatures and quantities of ingredients used.
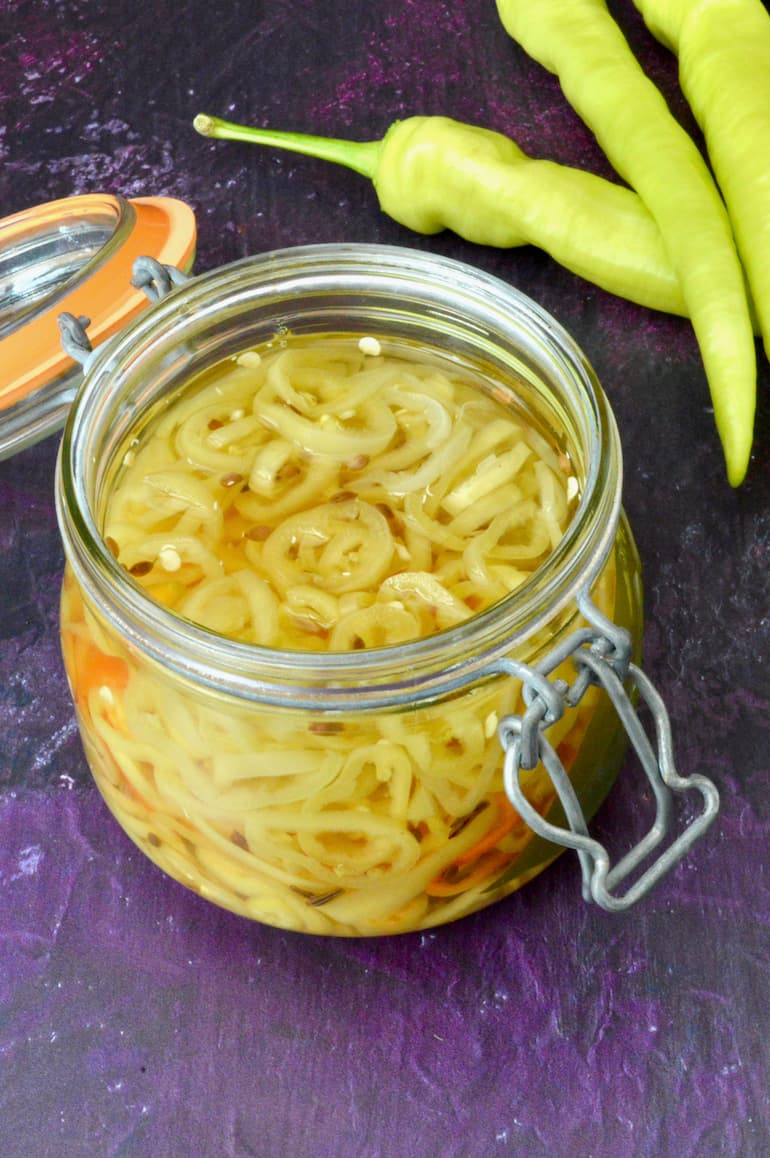
I like to slice chillies into rings rather than pickle them whole. It makes them a lot more versatile and their easier to serve and eat.
If, however, you’d prefer to keep them whole, find a suitable sized jar and prick the skins with a knife before pickling. Let them pickle for at least a week before eating.
Step 1. Slice Chillies
Make sure your chillies are nice and fresh. Old and wrinkly won’t cut it and you definitely don’t want them rotten. Wash and dry them before slicing.
Using a sharp knife, trim the stalks off the chillies, then slice into thin rings. Whether or not you want to remove the seeds and membranes first is up to you, but they will make the pickled chilli slices hotter. I leave them on as there’s a fair amount of extra work involved in removing them.
Place the slices in a clean sterilised glass jar along with a bay leaf. It’s best to use glass for pickles as metal will react with the vinegar and plastic may absorb it. See my guide on how to sterilise glass jars.
Top Tip
Either wash your hands immediately after slicing the chillies or wear rubber gloves when doing it. The chilli heat can irritate skin and leave a burning sensation which can last for several hours. The hotter the chillies, the worse it gets.
Step 2. Prepare Pickling Brine
Pour the vinegar and water into a small saucepan then add the sugar, salt and seeds. Bring slowly to the boil, giving an occasional swirl to dissolve the sugar.
As soon as the liquid is properly boiling, pour it over the chilli slices. Ensure the chillies are fully covered so that any air can’t get to them. If necessary top the jar up further.
Weirdly, when I pour the hot pickling liquid over the chilli slices, much of the green pigment is almost immediately washed out of them. I’ve read somewhere that hard water can do this. But it doesn’t seem to be the case for those that have coloured to orange and red. Luckily the flavour and texture is not affected.
Seal the jar with a tight fitting lid, then allow to cool before storing. Clip top jars are ideal. Leave at least two days before tucking in.
The chilli slices will keep for at least a month if stored in a cool, dark and dry place. Six months if stored in the fridge. Once opened, keep in the fridge and eat within four weeks.
What To Eat Pickled Chilli Slices With
Pickling takes the raw edge off chillies and also makes them slightly less hot. The slices make a great addition to salads, grain bowls, pizzas, sandwiches, burgers and cheese toasties.
They also pair well with Mexican dishes and many Asian ones too. Think nachos, tacos and noodles. Try them in this pico de gallo recipe found in my Mexican egg and beans on toast post.
Pickled chilli slices look fabulous scattered over bowls of dips. I find they go exceptionally well with hummus. For simple but moreish canapés, try topping charcoal or seaweed crackers with hummus, a dusting of sumac and a pickled chilli slice or three.
Save any leftover brine for cooking, sauces and salad dressings. It will infuse them with a significant, but not powerful heat.
Other Ways To Use Lots Of Chillies
- best chilli sauce you will ever taste
- chilli chocolate mincemeat
- chilli & tomato chutney
- crispy chilli oil
- quince jelly with chilli
- spiced apple chutney
Keep in Touch
Thank you for visiting Tin and Thyme. If you make these pickled chilli slices, I’d love to hear about it in the comments below. Do you have any recommendations or tips for pickling?
Please rate the recipe too. And do tag me @choclette8 on Instagram with your images, I love to see your take on my recipes.
For more delicious and nutritious recipes follow me on Twitter, Facebook, Instagram, Flipboard or Pinterest. And don’t forget to SUBSCRIBE to my weekly newsletter. Or why not join the conversation in our Healthy Vegetarian Whole Food Recipes Facebook Group?
If you’d like more pickle recipes, follow the link and you’ll find I have quite a lot of them. All delicious and nutritious, of course.
Choclette x
Pickled Chilli Slices. PIN IT.
Pickled Chilli Slices
Equipment
- 500ml clip top jars (affiliate link) optional
Ingredients
- 250 g chilli long chunky (ish) ones are best – can be green, red or somewhere in between.
- 1 bay leaf
- 200 ml apple cider vinegar
- 125 ml water
- 60 g sugar caster or granulated
- ½ tsp sea salt
- 1 tsp coriander seeds
- ½ tsp fennel seeds
Instructions
- Using a sharp knife, slice the chillies into thin rings – somewhere between 1 and 3 mm. Whether or not you want to remove the seeds and membranes first is up to you, but they will make the pickled chilli slices hotter.250 g chilli
- Place the slices in a clean sterilised jar along with a bay leaf.1 bay leaf
- Pour the vinegar and water into a small saucepan. Add the sugar, salt and seeds. Bring slowly to the boil, giving an occasional swirl to dissolve the sugar.200 ml apple cider vinegar, 125 ml water, 60 g sugar, ½ tsp sea salt, 1 tsp coriander seeds, ½ tsp fennel seeds
- As soon as the liquid is properly boiling, pour it over the chilli slices. Ensure the chillies are fully covered so that air can't get to them. Top the jar up further if necessary.
- Seal, then allow to cool before storing.
You have inspired me to grow some chillies indoors! They will add a nice pop of colour to my windowsill 🙂
They are very cheerful. I have one on the windowsill right now with lots of pretty red chillies.
Oh i do love some pickled veg! These look great.
cheers
Me too, I’m never quite happy unless I have some sort of pickles to hand.