Portuguese Bread and a Stacked Sandwich You Can Actually Eat
A really tasty Portuguese bread recipe with a tender crumb which works as well for making sandwiches as it does for mopping up soup, dips and sauces. It’s made with just four basic ingredients and uses the autolyse method, which helps develop great flavour and texture with minimal effort. The result is a beautifully aromatic loaf with a soft but bouncy structure that toasts wonderfully too.
This post may contain affiliate links. As an Amazon Associate, I earn from qualifying purchases. See my cookie and privacy statement for further details.
A few months ago, I attended a Thermomix demo. I’ve never come across one before, so it was interesting. But the highlight for me were the Portuguese bread samples. They were so delicious, I’ve almost become obsessed and have subsequently made a loaf, or my version of it, several times.
Dive Right In
- Why Portuguese Bread?
- Why You’ll Want To Bake Portuguese Bread
- For The Love of Portuguese Bread
- Ingredients, Additions And Substitutions
- How To Make Portuguese Bread
- How To Make A Stacked Cheese Sandwich
- Other Non-Sourdough Bread Recipes You Might Like
- Keep In Touch
- Pin It
- The Recipe
Why Portuguese Bread?
Hands up. I’ve never been to Portugal and don’t know if this is an authentic Portuguese bread recipe or not. Portuguese water bread (pão de água) was the name given at the Thermomix demo. However, traditional Portuguese bread is associated with the pre-soaking method employed in this loaf, so it might well have hailed from Lusitania (as Portugal is sometimes called).
The secret to this springy sandwich loaf is a method of soaking the flour in water before you add the yeast and salt. It’s called an autolyse and enables the flour to hydrate and thus develop more gluten. This in turn creates a smoother and springier loaf with a softer crumb which has more flavour and fragrance.
Why You’ll Want To Bake Portuguese Bread
- Big flavour from a basic dough – the autolyse method helps bring out natural sweetness and depth in the flour.
- Freezes well – so you can make a loaf ahead or stash slices for later.
- Great with anything – ideal for mopping up soups, stews, sauces, dips or just slathered with butter.
- Just four simple ingredients – flour, water, yeast and salt. Nothing fancy, just the essentials.
- Nutty richness from wholemeal flour – a mix of strong white and wholemeal gives balance and character.
- Only one knead required – the autolyse does some of the hard work for you.
- Satisfying to make – simple but rewarding, whether you’re new to bread or already a keen baker.
- Smells amazing whilst baking and beyond – your kitchen and senses will thank you.
- Soft but bouncy texture – perfect for sandwiches, toast or tearing and dipping.
For The Love Of Portuguese Bread
White bread, doesn’t generally do it for me. There are exceptions of course and this Portuguese bread is one of them. It not only has a delicious flavour and aroma, but it has a great texture too.

It doesn’t fall apart when slicing or making sandwiches, it does a good job of mopping up sauces, dips and soups and it makes fabulous crisp toast. What’s not to love?
Of course, I had to add some wholemeal to the mix. But I didn’t want to lose the wonderful springy texture of the bread, so I use nearly a third wholemeal to two thirds white flour.
It works wonderfully well, keeping all of the texture, flavour and fragrance, but with a decent bit of added fibre.
Because the flour is autolysed (soaked in water) before kneading, it only requires one round of kneading. This is always a bonus.
The bread makes a really good sandwich. It’s soft, holds together well and doesn’t have a particularly tough crust. You’ll find how to make my stacked cheese sandwich further down the post. It’s got a decent amount of filling in it, but you can still hold it in your fingers and get your mouth around it without everything falling out. That is, after all, the purpose of a sandwich.
And did I mention the toast? So good with a bit of butter and a good slathering of homemade lemon curd. It’s perfect for marmalade too.
It’s also an ideal bread to accompany this Portuguese vegan “fish” pâté.
Ingredients
There are only four ingredients needed to make this Portuguese bread: flour, water, salt and yeast.
Flour
The original recipe uses strong white flour. I’ve substituted about a third of that for strong wholemeal flour. I do like to get my fibre in wherever possible.
I haven’t tried making it with 100% wholemeal flour, because that would change it into a different type of bread. And given that I mostly make wholemeal rye sourdough, it’s nice to ring the changes.
Yeast
I used to avoid instant yeast and either used active dried yeast or fresh yeast. It isn’t my favourite but for the last couple of years it’s all I’ve been able to get hold of in my local supermarket. The baker, where I used to obtain my fresh yeast, closed some time ago.
So please use your favourite yeast and adjust the quantities as necessary.
How To Make Portuguese Bread
This is quite a wet dough and you’ll need a hand mixer with a dough hook or a stand mixer to knead it. Alternatively, you can use the stretch and fold method, but the instructions for that aren’t given here.
Please refer to the recipe card at the bottom of this post for cooking temperatures and quantities of ingredients used.
Step 1. Autolyse
Place the two flours in the bowl of your stand mixer or other large bowl if using a hand-held mixer. Make a well in the middle and pour in the water. Mix from the inside out with a long wooden spoon, or a spurtle if you have one until the flours are thoroughly combined with the water.
Cover the bowl with a clean tea towel or plate so that it doesn’t dry out. Leave to rest (autolyse) for at least thirty minutes and up to three hours.
Step 2. Knead Dough
Add the yeast to one side of the flour mix in the bowl and the salt to the other, then knead with your dough hook. If kneading by hand, use the stretch and fold method.
Cover the bowl again and leave in a warm place to rise until doubled in size. How long it takes will very much depend on room temperature and the quality of your yeast. But it should be somewhere between one to three hours.
Top Tip
The warmer the temperature, the quicker dough will rise. But the longer it takes to rise the more flavour and digestibility you’ll get. So if your kitchen is really hot, you might want to rest it in a cooler room.
Step 3. Transfer To Tin
Meanwhile grease your loaf tin, or line it with baking paper if needed. Although I’ve been using my tin for years, it still sticks which makes the bread really difficult to extract. So I’ve started to line it with paper and I no longer have a problem.
Tip the dough into the tin, using a dough scraper to help you. This is the only tricky part of the whole process, but try not to knock too much of the air out. Stretch the dough into the corners and try to make it as level as you can.
Place the tin in the centre of a cold oven, then turn it on. Bake until the loaf is well risen and lightly brown all over.
Test for doneness by turning the loaf out of the tin and tapping the bottom. It should sound hollow. If not, put the loaf back in the oven for a few more minutes.
Step 4. Enjoy
When done, turn out of the tin onto a wire rack to cool. Once completely cold, slice and enjoy.
Wrap it up well and it will stay fresh for a few days. It makes glorious toast as well as sandwiches and is great for mopping up just about anything.
For longer term storage, cut into slices and freeze. Make sure you place it in a suitable container or bag. It will keep well for three months.
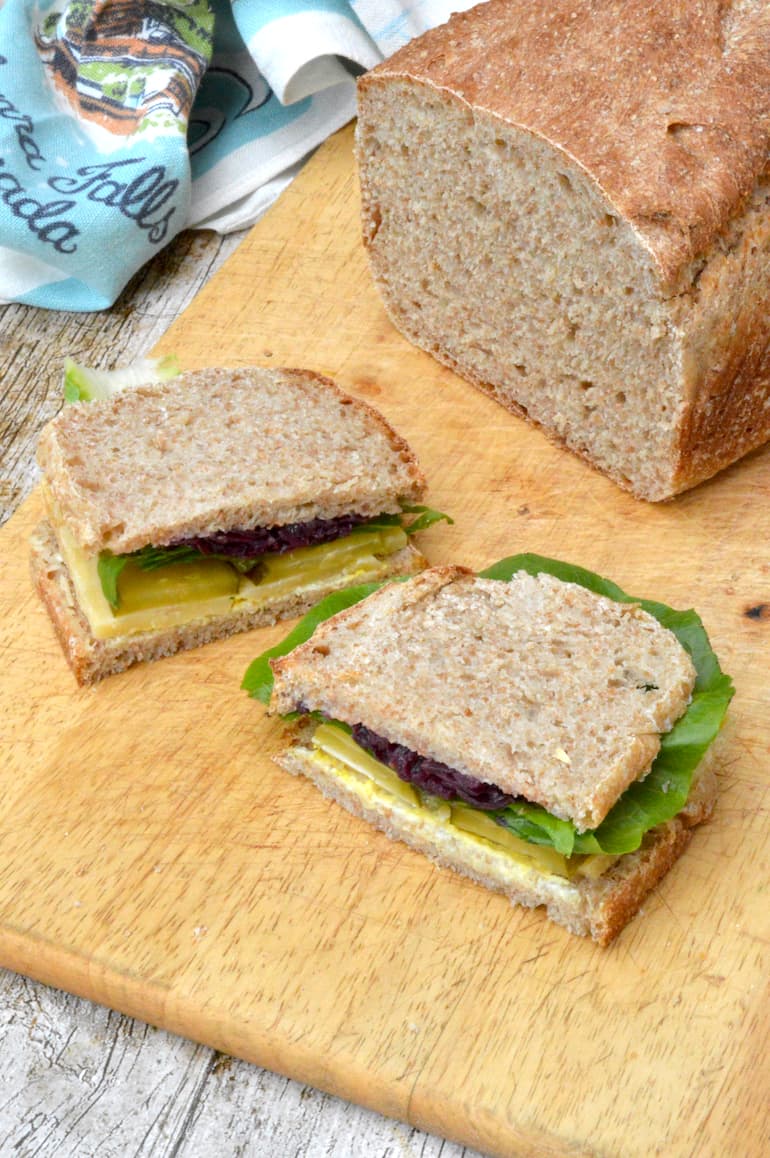
How To Make A Stacked Cheese Sandwich
When I see a club sandwich or similar, filled to the brim with masses of thick fillings, I always wonder how on earth people eat them. Isn’t the point of a sandwich that it’s finger food and easy to eat?
Anyway, my stacked cheese sandwich has seven colourful layers, not including the bread. And you can easily take a bite from this sandwich by just holding it in your fingers. It doesn’t fall apart and you can get your mouth round it without making an unsightly mess.
And it tastes absolutely delicious. Here goes:
1. Cut two slices of your homemade Portuguese bread. Make them as thick or thin as you like.
2. Spread both slices with mayonnaise. I use my absolutely fabulous homemade vegan mayonnaise. It takes all of three minutes to make and it’s all I’ve used for years now.
3. Spread mustard on one mayo slice and chilli sauce on another. This time I used German mustard, but normally I’d use English. Likewise I’d normally use my own homemade chilli sauce, but used sriracha this time.
4. Lay two thick slices of a good quality cheddar cheese on top of the mustard.
5. Top this with two long slices of pickled gherkins. Then lay one or two crisp lettuce leaves over the gherkins.
6. Spoon some pickled red cabbage or pickled beetroot over the lettuce. Then top with the second slice of bread with the chilli facing downwards.
7. Cut in half and tuck in.
Other Non-Sourdough Bread Recipes You Might Like
- Fruit loaf with prunes, walnuts & honey
- Malted wholemeal & rye loaf
- No-knead spelt bread with cocoa & molasses
- Olive garlic spelt bread with halloumi
- Savoury monkey bread with sun-dried tomatoes, mozzarella and basil
- Whole wheat focaccia bread
Keep in Touch
Thank you for visiting Tin and Thyme. If you make this Portuguese bread recipe, I’d love to hear about it in the comments below. Do you have any recommendations or tips for baking bread?
Please rate the recipe too. And do tag me @choclette8 on Instagram with your images, I love to see your take on my recipes.
For more delicious and nutritious recipes follow me on Twitter, Facebook, Instagram, Flipboard or Pinterest. And don’t forget to SUBSCRIBE to my weekly newsletter. Or why not join the conversation in our Healthy Vegetarian Whole Food Recipes Facebook Group?
If you’d like more sandwich recipes, follow the link and you’ll find I have quite a lot of them. All delicious and nutritious, of course.
Choclette x
Portuguese Bread. PIN IT.
Portuguese Bread
Equipment
- stand mixer (affiliate link) optional
Ingredients
- 500 g strong white bread flour
- 220 g strong wholemeal flour
- 550 ml water
- 1 tsp instant yeast (3g) or 4g active dried yeast or 10g fresh yeast
- 1 ½ tsp sea salt (6g)
Instructions
- Place the flours in the bowl of your stand mixer or other large bowl. Make a well in the middle and pour in the water. Mix from the inside out with a long wooden spoon, or a spurtle if you have one until the flour is thoroughly combined.500 g strong white bread flour, 220 g strong wholemeal flour, 550 ml water
- Cover the bowl with a clean tea towel or plate so that it doesn't dry out. Leave to rest for at least thirty minutes and up to 3 hours.
- Add the yeast to one side of the bowl and the salt to the other, then knead with your dough hook for six minutes.1 tsp instant yeast, 1 ½ tsp sea salt
- Cover the bowl again and leave in a warm place for the dough to rise until doubled in size. How long it takes will very much depend on room temperature, but should be somewhere between 1-2 hours.
- Meanwhile grease a 900g (2 lb) loaf tin, or line it with baking paper if needed.
- Using a dough scraper, scrape the dough into the tin. This is the tricky part, but try not to knock too much of the air out. Stretch the dough out to level it as best you can.
- Place the tin in the centre of the oven, then turn it on to 220C. Bake for 35 minutes until well risen and lightly brown all over. No need to pre-heat your oven.
- Test for doneness by turning the loaf out of the tin and tapping the bottom. It should sound hollow. If not, put the loaf back in the oven for a further 5-10 minutes.
- When done, turn the loaf out of the tin onto a wire rack to cool completely. Once completely cold, slice and enjoy.
Notes
Nutrition Estimate
This post contains affiliate links which are marked with an asterisk* or (affiliate link). If you buy through a link, it won’t cost you any more, but I might get a small commission. Thank you for your support of the brands and organisations that help to keep Tin and Thyme blithe and blogging.