How To Crystallise Flowers
Add a touch of elegance to your spring and summer cakes and desserts with some homemade crystallised flowers. Or just eat as sweets, they’re really delicious. They make lovely gifts too. Follow this guide on how to crystallise flowers and you’ll never be stuck for cake decorations again.
I’ve been making crystallised flowers since I was a teenager. Back then it was a spring tradition to crystallise primroses to decorate the Easter simnel cake. They’re not only pretty but they taste really good too. These days I mostly crystallise rose petals.
What Are Crystallised Flowers?
Crystallised flowers are flowers coated in a thin layer of egg white and sugar. This extends their life and preserves them for up to a year. The process captures the fresh and vibrant nature of beautiful edible blooms.

The sugar enhances their delicate flavour and they are delicious to eat. Use them to decorate cakes and desserts. Or simply eat as floral sweets.
One of the joys of crystallised flowers is that you can make them when flowers are in season, but use them when they’re out of season. Decorating autumn and winter cakes and desserts with spring and summer flowers brings back some of that welcome warmth and light.
Warning
Do not consume raw egg whites if you’re pregnant, elderly or a young child. Instead, follow my tips on how to crystallise flowers the vegan way. Scroll down towards the end of the post.
Which Flowers Are Edible?
It’s really important that you research which flowers are edible before you start. There are many poisonous plants, both in the wild and in gardens and it’s not worth chancing it. You also need to make sure your flowers are organic and haven’t been sprayed with anything nasty. There are plenty of edible flower suppliers out there, just make sure you choose a reputable one.
If you’re picking your own, do it on a dry day, preferably early in the morning. Having said that the flowers need to be dry, so ensure there is no dew on them.
I’m lucky enough to have a garden so I have access to quite a few unsprayed edible flowers. At the moment it’s roses, but in the early spring I like to crystallise primroses, violets and violas too. Violas make particularly stunning crystallised flowers.
Most of them work best as whole flowers, but roses are generally easier if you use the individual rose petals. Having said that, whole crystallised roses look striking.
Some Common Edible Flowers Suitable for Crystallising
Not all edible flowers are suitable for crystallising. Wild garlic flowers (ramsons), for example are edible and perfect for adding to salads. But they have a pungent garlic aroma and probably wouldn’t enhance your Victoria sponge cake.
Here are some of the more common blooms that make ideal crystallised flowers.
- alpine pinks
- borage
- cowslips
- forget-me-nots
- pansies
- primroses
- primulas
- roses
- violas
- violets
Top Tips
For flavour use sweet scented flowers such as roses.
Whilst not exactly a flower, mint leaves lend themselves to crystallising. They make a lovely green accompaniment to flowers when you use them for decorative purposes. As you can imagine, they taste amazing too.
How To Crystallise Edible Flowers
The most important thing you need to crystallise your own edible flowers is a bit of patience. I’m not very good at that, but even I think it’s well worth doing.
It’s a bit of a fiddly job, but actually quite an enjoyable one. It doesn’t really take very long to do either. But once you’ve sugared the flowers, they’ll need around twenty four hours to dry and crisp up.
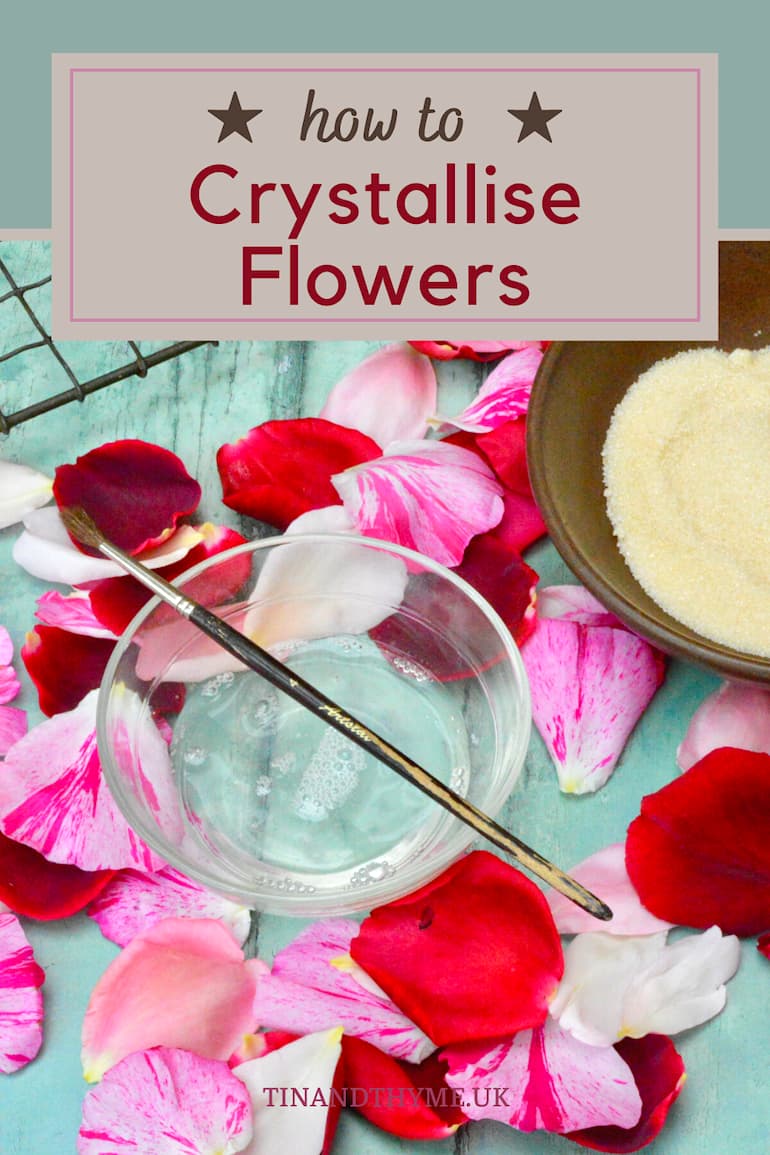
It’s a good idea to use white sugar so the colour of the flowers comes through. As you can see in the rose petal images here, I used golden caster sugar. It was all I had in the house.
Common wisdom has it that it’s best to remove the white heel at the the base of rose petals as well as alpine pinks. These have a bitter taste.
I never do, as really, it seems a step too far. I don’t do it for my rose syrup and I don’t do it when making crystallised rose petals. Unless you have super sensitive taste buds, the slight bitterness you get is ameliorated by the sugar.
You Will Need
You don’t need a lot of equipment or ingredients in order to crystallise flowers. but a small soft paintbrush is essential. A pair of tweezers is also helpful.
- 1 small artist’s paintbrush – ensure it’s clean and soft. I bought one that I keep solely for food purposes.
- 1 pair tweezers
- 1 teaspoon
- 2 small shallow bowls
- drying rack or tray lined with parchment paper
- pair of scissors to cut your flowers, if needed
- petals from one scented rose or a handful of smaller whole flowers
- egg white – see section further down this post for a vegan substitute
- caster sugar – fine white sugar is best as it’s more delicate and won’t mask the flowers’ colours. In the rose petal photos you can see here, I used golden caster sugar because that’s all I had.
How To Crystallise Flowers: Step-By-Step
Pick or buy your fresh edible flowers and have some fun.
Step 1. Prepare Work Area
Place the sugar in one of the bowls and the egg white in the other. Lightly beat the egg white with a fork to make sure it’s loose and easy to use. Place a teaspoon in the bowl of sugar.
Set a wire rack to one side of your work area or a tray lined with parchment paper, if you prefer.
Make sure you have a paintbrush and pair of tweezers to hand.
Step 2. Paint Flowers
Pick up a flower or petal with your tweezers and dip the paintbrush into the egg white. Lightly paint the entire surface, both front and back, with the egg white.
Top Tip
Wash the paintbrush well as soon as you’ve finished using it. If you don’t the egg white will solidify the bristles.
Step 3. Sugar Coat
Hold the flower or petal over the sugar bowl and use the teaspoon to lightly sprinkle the sugar on one side. Turn it over and sprinkle the other side so that the entire surface is coated.
Give the flower or petal a gentle shake to remove any excess sugar.
Top Tip
It’s tempting to dunk the flowers into the egg white and then do the same with the sugar. In theory the process is quicker this way, but in practice you’ll end up with a mess of clumped sugar which either won’t cling to the flowers or will look very messy.
If you do it this way, the flowers get too wet and then drip into the sugar which then causes it to clump up. So it really is best to stick to the paintbrush method.
Step 4. Dry Flowers
Place the flower on the wire rack or lined tray. Repeat until you’ve coated all of your flowers. If you need to top up the sugar, then do so.
Leave to dry in a warm airy place for sixteen to twenty four hours. An airing cupboard is ideal. How long it takes will depend on the size of the flowers, how much egg and sugar you’ve used and the air quality and temperature.
When they’re crisp all over, they are fully crystallised.
Step 5. Store Flowers
When the flowers are completely dry all over, place them in a sealed container lined with greaseproof or parchment paper. Arrange them in single layers with a sheet of parchment or greaseproof paper between each layer. They should last for up to a year.
Vegan Crystallised Flowers
You can substitute the egg white with aquafaba or make a light sugar syrup. Use either of these to paint the flower petals, then coat with sugar as per the recipe.
How Long Do Crystallised Flowers Keep?
Crystallised flowers will keep for up to a year in a sealed container. Just make sure they are thoroughly dry, then layer them between sheets of parchment paper.
The colours may change a little as the sugar dries the flowers out and crystallises them. But they’ll still be beautiful and tasty too.
When you open the tin you’ll get a waft of beautiful scent, especially if you’ve crystallised scented roses.
Recipes To Use With Crystallised Flowers
Many bakes and desserts benefit from a bit of decoration. Crystallised flowers add a pretty and natural touch.
Here are a few suggestions of recipes to use for your sugared flower decorations.
- Chocolate Easter cupcakes
- Lavender honey cake
- Raspberry cream sponge cake
- Rose cupcakes
- Summer berry trifle
- Very cherry cream dessert
And if you prefer your flowers unsugared, I have a post on how to dry rose petals and what to do with them.
Keep in Touch
Thanks for visiting Tin and Thyme. If you have a go at crystallising flowers, I’d love to hear about it in the comments below. And do please rate the recipe. Have you any top tips? Do share photos on social media too and use the hashtag #tinandthyme, so I can spot them.
For more delicious and nutritious recipes follow me on Twitter, Facebook, Instagram, Flipboard or Pinterest. And don’t forget to SUBSCRIBE to my weekly newsletter. Or why not join the conversation in our Healthy Vegetarian Whole Food Recipes Facebook Group?
If you’d like more flower recipes, follow the link and you’ll find I have quite a lot of them. All delicious and nutritious, of course.
Choclette x
How To Crystallise Flowers. PIN IT.
How To Crystallise Flowers – The Recipe
How To Crystallise Flowers
Equipment
- 1 small soft artist's paintbrush
- 1 pair tweezers
- 1 teaspoon
- 2 small shallow bowls
- drying rack
Ingredients
- petals from two scented roses or a large handful of smaller whole edible flowers
- ½ egg white
- 25 g caster sugar
Instructions
- Place the egg white into a small bowl and lightly beat with a fork.½ egg white
- Hold a flower or petal with the tweezers, then use the brush to paint the entire surface of the flower with the egg white. Try not to make the surface too wet.petals from two scented roses or a large handful of smaller whole edible flowers
- Use the teaspoon to scatter a little sugar over both sides of the flower or petal so that it’s more or less covered.25 g caster sugar
- If the flowers or petals are quite large, lay them onto a wire rack to dry. If they’re smaller or particularly delicate, lay them on a tray lined with parchment paper.
- Leave in an airy place to dry for about twenty four hours. You’ll know they’re done when they’re crisp all over.
- Once thoroughly dry use to decorate your cakes and desserts. Alternatively store between layers of parchment paper in an air tight container for up to a year.
Video
Notes
Nutrition Estimate
Sharing
I’m sharing this how to crystallise fresh flowers with Farmersgirl Kitchen for #CookBlogShare.
I love doing this and have a friend who makes a Simnel cake but never tries the primroses as she says it must be too fiddly…well I try to do my borage flowers to put on the top of my homemade chocolates and they always look interesting but not quite as delicate as I would like. Do you suggest egg whiting both sides of the borage flower? Also with a fine dusting of sugar they look very pretty rather than covering them which tends to make the sugar clump up in places even though I am using a paintbrush to apply the egg white. If the light dusting of sugar makes them look prettier and more delicate will that still preserve them? Thanks for your advice! I can put a photo of the ones I am doing at the moment if that helps!
Hi Yolanda, I’ve never tried borage flowers, but they are so pretty, I bet they look delightful as a chocolate decoration. Yes to applying egg white to the undersides, the whole thing needs to be covered if you want to preserve them. But I don’t see why a dusting of fine sugar won’t work – just as long as the whole flowers are covered. I still have flowers that I made a year ago that are still good to eat. I’d love to see a photo of your finished flowers and chocolates.
Always wondered how this is achieved – cakes are so pretty with flowers on them so will be giving this a go this summer with some of my garden blooms.
Yes, do give this a go Rebecca. Everything you do always looks splendid, so I reckon your cakes will be looking very pretty indeed.
It’s funny… I love eating flowers, but I’m always super-scared I’ll eat something I shouldn’t. Your roses look absolutely perfect and are not something I would have tried. Thank you for showing me how xxx
Thank you Kate. At least you know roses are safe to eat – assuming they’re unsprayed. I suspect your daughter might like to give them a try.
What an interesting technique!
It’s a lovely way to preserve a few fresh flowers.
Such beautiful decorations for a cake or biscuit. Thanks for the easy to follow instructions and the video which makes everything clear.
Thank you Janice. There’s something a bit special about real flower decorations. I’m so glad you found the video useful.
What a fun project!
Yes it is fun and although they’re covered in sugar, it’s not actually very much.
This is such a simple process and I didn’t know that once made you could store them for up to a year. What a pretty way to decorate our bakes all year round.
Yes exactly Lesley. As long as the flowers have dried properly and you keep them in a sealed container, it’s quite astonishing how long they’ll last.